Painting with Stains

I’ve had several conversations about this subject. Mostly questions are around how to control the way the colour takes to the timber. It’s something makers can struggle with. But if you navigate the techniques below, I think you'll appreciate the results.
Project Materials
- Spirit wood stains, ‘wood colours’ and ‘rainbow colours’ (Chestnut Products Ltd.).
- Clear methylated spirit (regular purple meths if you can’t get the clear stuff.
- Kitchen roll
- Masking tape
- Aerosol sanding sealer (acrylic or cellulose)
- Exterior matt acrylic varnish
Tools required
- Bottle holder(s)
- Dropper bottles (optional) - blocks of timber with 35mm diameter recesses
- Plastic paint palette (with wells)
- Small round artists brushes
- 3/0 for fine detail
- 0 for small areas
- 3 and 6 for washes
- 240grit sandpaper
- Fine v-gouge
- Stiff short bristle brush
Techniques
Before taking on a project I'm listing the individual techniques employed when working with stains. Some of these techniques should be practiced on scrap wood before moving on to your carefully carved bird. And remember, final colours are dependent on the colour of timber they are applied to - Another reason for practicing on scrap timber.
- A. Colour washing
- First wet the wood surface by painting on a little methylated spirits with a small brush. Then dispense a small quantity of a given colour into a well on your palette. Dilute this stain with methylated spirits and paint onto the wetted timber. This allows you to apply colour in layers and build it up to achieve the desired saturation.
- B. Detail painting
- When painting details dispense a given colour stain from the bottle into one of the wells on your pallet. The spirit will start to evaporate so that the longer it stands the ‘thicker’ it will become - more saturated with pigment. Dip the very tip of a 3/0 brush in the dispensed stain so that the brush is wet but not loaded – this allows you to apply just a little stain at a time. Wood tends to draw liquid from the brush, so if the brush is loaded with stain the colour will flood onto the timber - You’ll have little control over where the stain ends up. Use kitchen roll to soak excess from the brush.
- C. Transitioning
- Colour stains will naturally bleed into one another and in doing so develop wonderfully natural colour transitions. This is most easily achieved by applying your chosen stain next to another that hasn't already dried. If you paint one colour stain next to one that has dried, colour bleed is reduced.
- D. Contrast
- To achieve best contrast between areas of different colour, allow one colour to dry before applying the second adjacent colour. Don't overload your brush. For the sharpest of contrast don't paint the second colour right up to the first. Instead allow the second colour to bleed up close to it and then with a small almost dry brush touch in the contrasting colour so that there isn't enough liquid stain to bleed into the first colour. Touch in with a fine brush like a 3/0 round. An additional technique here, you can also use a fine gouge to carve a narrow groove between colours. This gives a hard dry line between adjacent colours that can be left natural grain if that works for the look you are after, or it can be touched in with one or other of the two colours, again working with a fine, almost dry brush.
- E. Mixing on the object
- It is possible to apply different colour washes over one another, mixing the colour directly on the carving. It helps if you are familiar with a little colour theory but in its absence simply test your colour effects by painting first on a test piece of timber. I regularly paint yellow, green, blue and black as very thin washes to achieve the right colour for a beak.
- F. Revision
- Sometimes you'll want to adjust colours, definition and detail. This can be achieved usings two methods or combining the same two. Using fine sandpaper, nothing more course than 240grit, it is possible to remove varying amounts of colour stain. Rubbing down any area will start to lighten it. Rubbing down detail will blur its edges. This allows you to apply new washes of colour or to redefine details. Using a V-gouge it is possible to recut a texture or redefine an area completely removing the stain while retaining the shape of the subject. This allows you to apply new colours in these places of to extend adjacent areas of colour.
- G. White stain
- Before use, stir the white stain since its pigment settles and unless used very recently a good shake won’t mix all the pigment into the spirit. Note also, proceed with caution if you dispense white stain into a dropper bottle - dropper bottles don't always seal quite well enough to prevent leaking when shaken hard.
- H. Cleaning a brush
- If already loaded with stain, dry the brush on kitchen towel. Then rinse the bristles in meths before drying again on kitchen towel. Use one of your small pots of meths to rinse the brush. Keep one pot for white; one for dark colours; and one for light colours.
- J. Dispensing stains
- The two simplest methods of dispensing colour stains are firstly to dip a brush in the stain bottle and drip stain onto your palette - this can be wasteful. The second method, and my current favourite, is to transfer all your stains into dropper bottles - then simply use the glass dropper, to draw up and drip out the given colour.
- K. Finishing
- Leaving tape in place wherever the carving was previously masked, add disks of masking tape to just cover the eyes. With everything masked, use aerosol sanding sealer (acrylic or cellulose) to seal the timber and the stain. Don't be tempted to apply a sealer by brush, the white stain especially will lift into solution and spread into adjacent areas. A couple of applications of sealer should do the trick. When the sanding sealer is dry apply a few coats of aerosol clear matt exterior acrylic varnish (I use a Humbrol product). This gives a durable matt finish that maintains a more natural and convincing appearance. Remember to do this work outside (you'll need a dry day) and wear a suitable mask against VOCs and mist particles.
Care
- Wear nitrile gloves or similar, to keep stain off your hands.
- Wear eye protection to guard against getting spray sealant or varnish in your eyes.
- Keep your work area ventilated when using spirit wood stain or any materials with VOCs (Volatile Organic Compounds).
- Secure the bottle of stain in a holder of some sort OR at least put it in the middle of a large tray when using it. It’s easy to knock an unsecured bottle over and the resulting spill will at best, cause havoc.
Applying the techniques
What follows is a series of steps painting a wren staff. In the account I refer back to the techniques above.
Step 1
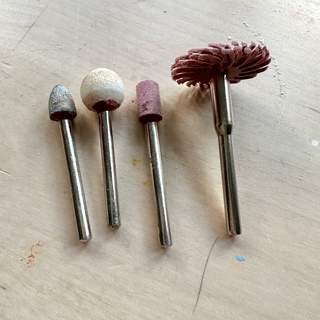
If you haven't already, 'de-fuzz' your carving with a stiff short bristle brush. Or, if you have one, use a rotary tool for the purpose, I use abrasive wheels from Woodart Products (https://www.woodart-products.co.uk/) visible in this photo, on the right. Then mask your carving with decorator's tape leaving exposed only the parts to be painted with stain.
Step 2
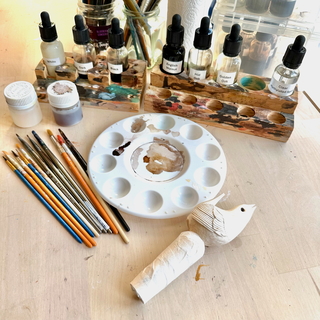
Gather all your materials and equipment listed above. Set up your bottles of stain on a tray or better still, in holders. Use an artist’s palette with wells, for mixing and thinning colours.
Have your clean brushes to hand and three small pots of methylated spirit – clear meths if you can get it but regular purple stuff will do otherwise.
Step 3
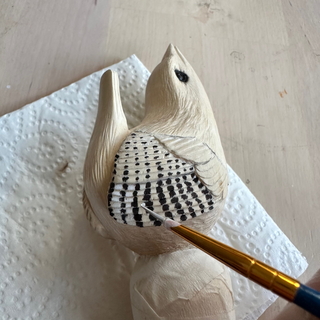
Using technique B, touch in the black bars on the primary and secondary flight feathers - you want 8 or 9 bars per feather - with a 3/0 round brush. Then touch in the white bars between on the primary feathers (the first 7 feathers on my carving.)
Step 4
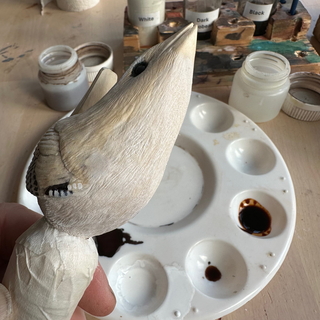
Dispense more white stain in a well on your palette. Dipping a No. 5 round brush paint white stain on the chin, throat, breast, belly, base and underside of the tail. Put on a couple of thin layers only. The timber will usually show through – that’s fine. Let the stain dry.
Step 5
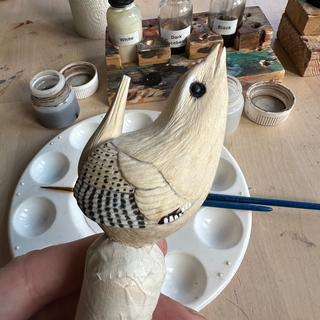
Using technique B, a 3/0 round brush, paint in the white eye stripe, and the black and white detail on the aula.
Step 6
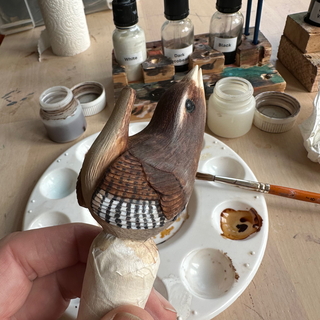
Dispense golden oak and English walnut, into separate wells on your palette. Using technique A, with a No. 3 round brush, apply golden oak on top of the tail, the back, crown, cheeks, mantle, secondaries and coverts. Then following technique C, over paint everything you just painted golden oak with English walnut except the secondaries and coverts.
Step 7
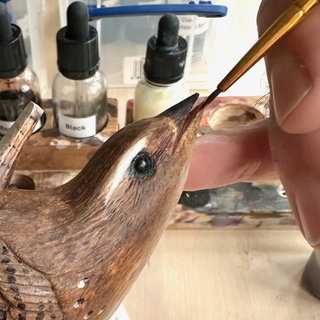
Avoiding the inside of the beak, following technique B, paint the upper mandible with antique mahogany, the lower mandible with dilute yellow overpainted with dilute English Walnut. When that's dry, paint the inside of the beak with rosewood stain.
Step 8
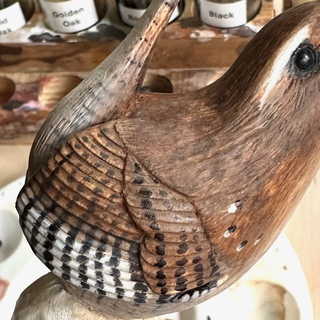
Continuing with technique B, touch in the black bars on the coverts and the tail. Then using the same detailing technique touch in four dots of black, in an upturned arc as a scapular pattern. To the rear of the four back dots, add white highlights.
Step 9
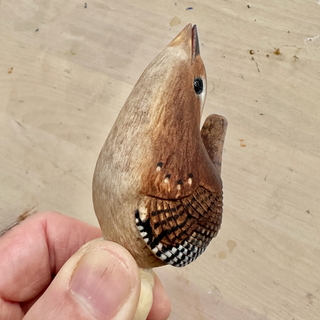
When all the stain is dry, it’s time to knock back the white on the chin, throat, breast, the body below the wings, and underside of the tail. Following technique E, wet the white with a little meths on a brush then overpaint it with a little dilute ‘antique pine’ or heavily thinned ‘English walnut’.
Step 10
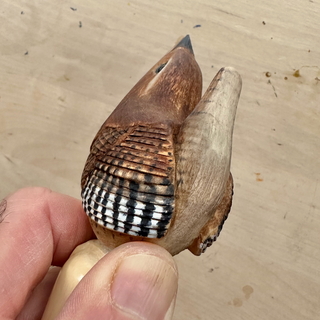
When all is dry you can modify the colours, even the surface texture. You can sand areas and reapply stain. You can carve into the surface to define more feather texture. Then simply add back either new colour or similar to what was there before. The stain will merge seamlessly with preceding applications.
Step 11
To complete the piece, make sure everything that needs it, is masked. Add tiny disks of masking tape over the eyes for instance. Then proceed to the finishing process, technique J.