Dowel Joint

What follows is an outline of how to create a traditional dowel joint for a walking stick. To carry out the same you'll need a correctly prepared carving blank and a straightened piece of hazel (or other coppice material).
Prepare the carving blank

The timber block for the stick top should have a finished work face (preferably cross-cut with the flat face formed by end grain), with a mortise drilled out to your chosen diameter and to a depth of approximately 60mm. You can buy prepared timber blanks but if you work at scale you should machine your own lengths of rough sawn timber. I buy maple, ash and cherry, 2-3m, 6"x2", sawn. I smooth and square this using a thicknesser, before cross-cutting into lengths using a fine toothed chop saw. Using professional shop equipment that doesn't vibrate or overheat gives me perfect cut faces and blocks that are all square. This makes drilling the mortise very easy work on a drill press. With the hole properly perpendicular to the face and all sides square, all stages of work thereafter become straight forward. If you don't have access to suitable shop equipment either buy carving blanks or find a wood shop that for a sensible fee will machine rough sawn planks for you.
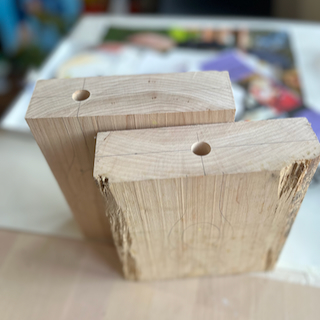
Tools required
- Brad point wood bit (diameter to suit) - Mostly I use 13, 14, 15 and 16mm bits - proportionate to the diameter of the shaft.
- Hand drill - Preferably a small battery powered unit.
- A fine toothed hand saw a trim or pull model - You may find a traditional dovetail saw or even a hacksaw works for you.
- A fine toothed (22t) flat wood rasp - Or use the flat side of a half-round.
- Sanding block with 80 grit paper.
- Wood carving knife. I like the longer Morvik, Mora 106.
- A Vernier caliper - I use a digital model since it's quick and easy to use.
- Face mask - For any dusty work use a P2 or P3 mask - or whatever the safety standard is for your area for find particulate matter.
Stage 1
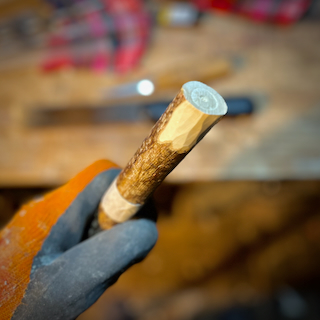
Mask around the hazel to define the shoulder. Using a fine toothed saw, cut a shallow ring, no deeper than a millimetre or two, following the edge of the masking tape. At the end of the stick, find its centre and using the brad point bit, drill the top end of the shaft until the brad points deeply score the timber. This defines the diameter of the dowel and provides an easy mark to work to. The bit used should be the exact same one used to drill the mortise in the timber block from which you'll eventually carve the top.
Stage 2
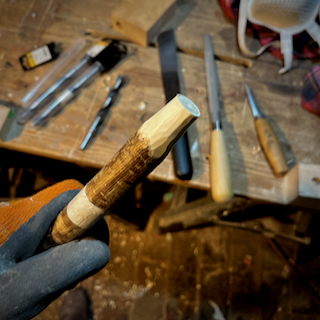
Remove material to roughly define the dowel. I start with a carving knife (I use a Mora 106 here), clearing the bark and working towards the general shape. I follow up by using a fine wood rasp (I use a Rider 22t flat rasp here) to get close to the final diameter. If you use the brad point bit at the start, you’ll see a feather edge of wood fibre as you get close to the mark at the tip of the dowel. At this point I use a sanding block with 80grit paper to work down to a reasonably smooth surface and a well defined dowel. Test fit the dowel several times as you shape it, making sure not to remove too much material.
Stage 3

Push fit the dowel into the pre-drilled wood block. Use a combination of the tools used already to achieve a good tight fit. Note: A word of caution - if the wood block to be carved is of a relatively soft or weak timber, like lime or yew, be careful, too tight a fit and you’ll split the block. Get this bit right however, and you’ll save a lot of bother trying to get a good fit-up later.
Stage 4
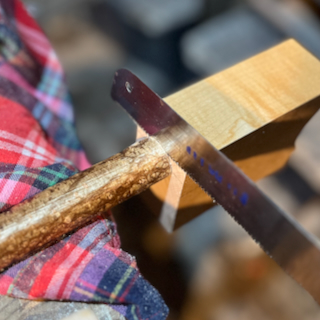
With the wood block pushed on the dowel and butted up as tight against the shoulder as possible draw on alignment marks so the block and hazel shaft can be pulled apart and put back together in the same position relative to one another. Use a saw (I use an Urwin fine trim saw) guided by the wooden block face to cut a new shoulder to the hazel stick dowel joint. Be careful not to cut the joint face of the timber block. You may need to repeat this stage a couple of times depending on how true your other stages have been.
Done with care this will achieve a descent fitting joint that also does not require any kind of clamping at the fit-up. It will also use the least glue possible. Before you attempt final fit-up, make sure to carve a relief channel the full length of the dowel to allow excess glue to be expelled, otherwise you won’t manage to close the joint.